
Right, lets get you up and running.
Below, we’ll go through the 3 things you need to do before you can join a Gamenight evening:
- Downloading and setting up AmigaLive (dead easy)
- Installing and setting up Discord (even easier)
- Making a Twitch account (unbelievably easy)
Downloading and setting up AmigaLive
This is the program we use to play Amiga games online with others – it’s awesome! It’s free, requires no registration, and is ad-free too. It has hundreds of Amiga games ready to play – you don’t need your own. You also don’t need to be a techie to use it – it’s really easy. That’s kind of the point of it.
You can download it for free (for either Windows, Linux or Mac computers) from the download page of this website. Once downloaded, set up is dead easy.
Once you’ve extracted your AmigaLive download it’ll just sit in a folder on your desktop. Click the .exe file in the folder to open it.
Click in the name-tag box shown in the following image and choose the three letters you’d like to be used to identify you during the game:
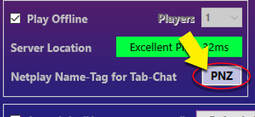
Close AmigaLive again. That’s it.
If you want to use a USB joypad or controller (instead of or as well as keyboard/mouse) you’ll need to configure it – just once. It’s dead easy, and instructions are below.
If you want to play some games ahead of a Gamenight, there’s some helpful instructions to get you started here!
Setting up a controller in AmigaLive
If you’re anything like us, you won’t fancy trying to play most games with a keyboard (if you do though then great, you can ignore this section).
Most USB gamepads and joysticks will work fine with AmigaLive once you’ve done a one-time set up, as detailed below.
1. Plug in your controller before you open AmigaLive
2. Open AmigaLive
3. Click on ‘More options’ at the bottom right of the main menu page:
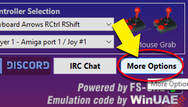
4. Click on ‘FS-UAE GUI’ at the top right:

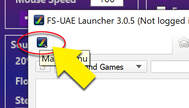
5. Click on the image that looks like an Amiga ‘tick’ on the top left:
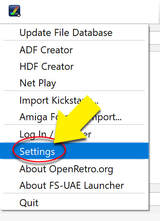
6. Click on ‘Settings’ in the dropdown box that pops up:
7. Click on ‘Controllers’ on the left, and then double click on the name of your controller in the box on the right (or the name it is given on this screen, at least):

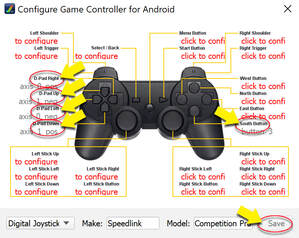
8. You’ll see the image below (don’t worry, you don’t need to have a Playstation controller, it’s just the controller image used here!). Click on the various boxes around the edge of the controller and then press the direction or button on your controller that you want to attribute to it. E.g. Click on ‘d-pad right’ and then press right on your controller. As a minimum, you’ll need to designate those directions and buttons highlighted below (you could also designate analog stick directions if you want to use those, and some games do support a second fire button too). Once you have, click ‘Save’ at the bottom right:
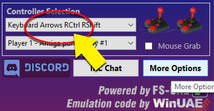
9. Close down all windows until you get back to the AmigaLive main menu. Then in the ‘Controller selection’ menu, choose your newly-configured controller from the dropdown menu:
10. From now on, providing the controller is connected before you start AmigaLive, it will be selected here automatically. Always check before starting a game though or you might find yourself playing with the keyboard instead!
If your controller still isn’t working when you start a game, have a look at this page where we outline a couple of common problems that can make that happen.
Installing and setting up Discord
If you’re joining the tournaments or want to arrange your own matches with other AmigaLive users during the evening then we and they need to be able to communicate with you – and you with us and them.

1. We use an app called Discord for this, which is basically a messaging and voice chat app. To join the AmigaLive ‘server’ on Discord (called a ‘server’, but basically a chat group), follow this link.
2. You’ll need to register- it’s free.
3. On the AmigaLive ‘server’ there are various channels for different topics – general text chat (‘amigalive’), technical issues (‘bug-reports’), etc. You can see these listed down the left-hand side of the app. Several of the channels are voice channels (easily identified by the speaker and headphones icons next to them). When it’s time to join the event, jump on to the AmigaLive Discord server and look for the voice channel we’re in (demiurgi or pNutttz), and click in the channel name to join. You should then be connected to voice chat with us. Lucky you.
Just so you know, we do stream the events live on the Twitch website – so other people watching will be able to hear you talking at times. So probably best not to say anything incriminating – like how you’re planning to rob a bank, or that you like listening to Taylor Swift albums.
Making a Twitch Account
If you’re not familiar with Twitch, it’s a website and app where you can watch people streaming whatever they want, live – or stream stuff yourself. We stream our tournaments live as we play them – this allows everyone involved with the tournament to watch it (along with anyone else who might be interested), and to chat with each other using the onscreen text chatbox. If you’re having any problems with your Discord set-up this is also where you’ll still be able to hear us, and communicate with us using the chatbox.
You can make your free Twitch account here: www.twitch.tv/login


_03.png)

_04.png)


